Understand the Exposure Triangle
You want to understand the exposure triangle as it is a fundamental concept in photography that every aspiring photographer should grasp. As an online photography teacher and coach with over 20 years of experience, I’m here to break down this concept into simple terms.
After buying a new camera, the most important thing to do is practice working on and mastering these principles. The faster you can understand the exposure triangle and master these principles, the quicker you will use your new camera to get some fantastic images. I have some great Cheat Sheets to help you understand Aperture, SS and ISO.
What is the Exposure Triangle?
Photography is all about light and capturing moments; you want to understand the exposure triangle…it is your key to unlocking creative control over those moments. Don’t worry if it sounds complex; we’ll take it step by step.
The exposure triangle is the delicate balance between three essential elements that determine the exposure or brightness of your photograph. These three elements are:
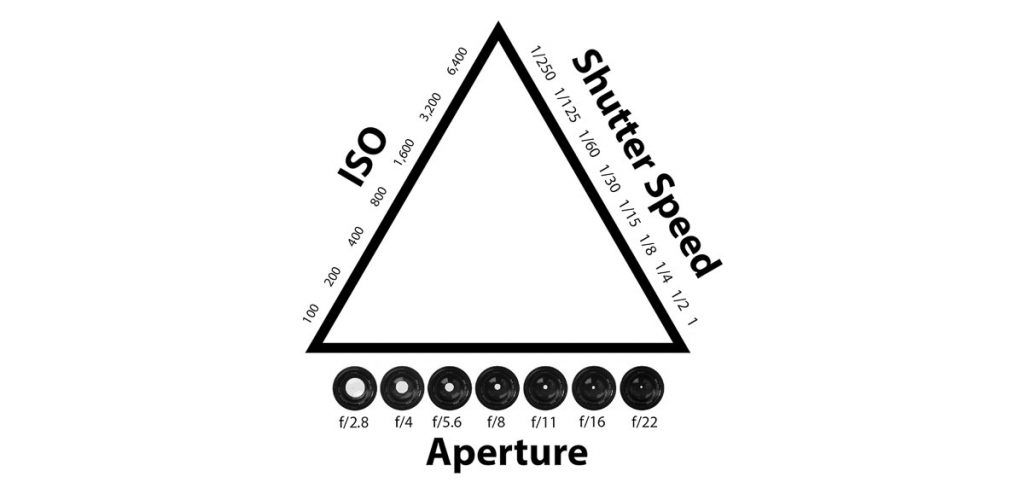
- Aperture: Aperture refers to the size of the opening in your camera’s lens. It’s measured in f-stops, with lower numbers like f/1.4 indicating a wider opening, while higher numbers like f/16 represent a smaller one. Aperture controls the amount of light entering the camera and influences depth of field, which is how much of your image is in focus.
- Shutter Speed: Shutter speed determines how long the camera’s sensor is exposed to light. It’s measured in seconds or fractions of a second. A fast shutter speed, like 1/1000 sec freezes action, while a slow one, like 1/30 sec can create beautiful motion blur.
- ISO: ISO measures the sensitivity of your camera’s sensor to light. Lower ISO values (e.g., ISO 100) are less sensitive and best for well-lit scenes, while higher ISO values (e.g., ISO 1600 or more) make your camera more sensitive to light but can introduce digital noise or grain to your images.
Finding the Perfect Balance
Let’s dive deeper into each element of the exposure triangle to help you understand the exposure triangle.
Aperture: Controlling Depth of Field
One question that I am always asked when talking about photography is, what is camera aperture? And what aperture do I use? And when?
I believe that aperture is where photographic magic happens and you definitely want to understand it to understand the exposure triangle. It adds dimension and light to your photograph, allowing you to achieve a blurry background effect.
It’s not as difficult as it may seem, and the aperture is more about your lens than your camera. The aperture is like the eye of your camera, controlling how much light enters the lens. However, it also significantly impacts the depth of field in your photographs.
Wide Aperture (Low f-number)
- When you set your camera to a wide aperture, like f/1.8 or f/2.8, you’re allowing a lot of light to hit the sensor.
- The lower the number, the bigger the hole, the more light that comes in, resulting in only a small portion of your photo being in. This helps you achieve those pictures with a blurry background.
- Shooting a larger aperture—F1.8–2.5 means more light will come into the camera and less focus in your photo. This is perfect for low-light situations or when you want to isolate your subject from the background. Wide apertures create a shallow depth of field, resulting in a beautifully blurred background (bokeh) that makes your subject pop.

Narrow Aperture (High f-number)
- On the other hand, choosing a narrow aperture, such as f/11 or f/16, reduces the amount of light reaching the sensor.
- The higher the number, the smaller the hole, the less light that comes in, resulting in a larger portion of your photog being in focus. This helps you achieve a photo where the whole image is crisp and clear. Shooting a lower aperture-F16-22 means less light will come in and more focus. Lower apertures are great for landscape shots.
- This setting is ideal for situations where you want everything, from the foreground to the background, to be in sharp focus. Narrow apertures produce a deep depth of field.

Shutter Speed: Capturing Motion
Shutter speed determines how long the camera’s sensor is exposed to light how long your shutter is open, and it’s crucial for capturing motion in your shots.
Many times, people’s photos aren’t sharp because their shutter speed is too slow. They may not fully understand the exposure triangle and how shutter speed works to create a sharp image.
The longer the shutter is open, the more room for shake or movement, resulting in a blur in your images and a soft, out-of-focus photo. I teach my students to keep their shutter speed above 1/100. If you go below, it helps to use a tripod.
- Fast Shutter Speed: A fast shutter speed, like 1/1000 or 1/500 sec, freezes fast-moving subjects. It’s perfect for sports photography, wildlife, or any situation where you need to capture a moment with minimal motion blur. Fast shutter speeds also allow you to shoot handheld without worrying about camera shake.
- Slow Shutter Speed: If you want to get creative and introduce motion into your images, go for a slow shutter speed, such as 1/30 or 1/15 sec. This can create stunning effects like light trails from moving vehicles, silky smooth waterfalls, or dreamy long-exposure landscapes. However, as I mentioned, using slow shutter speeds requires a tripod to prevent camera shake.

ISO: Balancing Sensitivity and Noise
ISO is a setting that will make your photo brighter or darker and is key to help you understand the exposure triangle. It measures your camera’s sensitivity to light, and it’s an essential element for adjusting exposure.
Your camera has a “base” ISO. The base ISO is the lowest ISO your camera can go and is usually ISO100 on most cameras. This base ISO is where you can get the highest quality image with the least amount of noise.
If you increase your ISO, the sensitivity to light in your camera increases, resulting in a brighter picture. With every bump up the ISO, you are doubling the brightness of your image.
- Low ISO (e.g., ISO 100): In bright conditions, use a low ISO setting to maintain image quality. It produces crisp, noise-free images. However, be cautious when using low ISO in low-light situations, as it may necessitate slower shutter speeds or wider apertures to compensate for reduced sensitivity.
- High ISO (e.g., ISO 1600 or more): When shooting in low light or when you need to freeze motion with a fast shutter speed, you’ll increase the ISO. Higher ISO settings make your camera more sensitive to light, allowing you to capture images in challenging lighting conditions. However, the trade-off can be increased digital noise or grain in your photos. Modern cameras handle high ISO settings better than older models, but it’s still essential to strike a balance to maintain image quality.

To truly understand the exposure triangle, it’s important to experiment with these settings in different shooting scenario. Go out and practice, taking note of how each adjustment affects your images.
Use the free Exposure Triangle Cheat Sheets or if you are ready to understand the exposure triangle today, come join my Beginners Photography Essentials Course
Through hands-on experience, you will gain the confidence to adjust the exposure triangle settings easily to achieve your perfectly created photo.

